
Whether you’re taking your first yoga class or your hundredth, it’s easy to feel lost after an hour-long practice. My leg goes where? Can I hurt myself doing this? What does Namaste even mean? If you’re curious about how to tackle basic yoga poses properly, this guide is for you. Here are nine common poses you’re likely to see in a typical yoga class, plus commentary from alignment-focused yoga teachers about how to do each pose in a way that supports your body. (We’ve included both the English and Sanskrit names, since many teachers will use both.)
1. Downward-Facing Dog, or Adho Mukha Svanasana
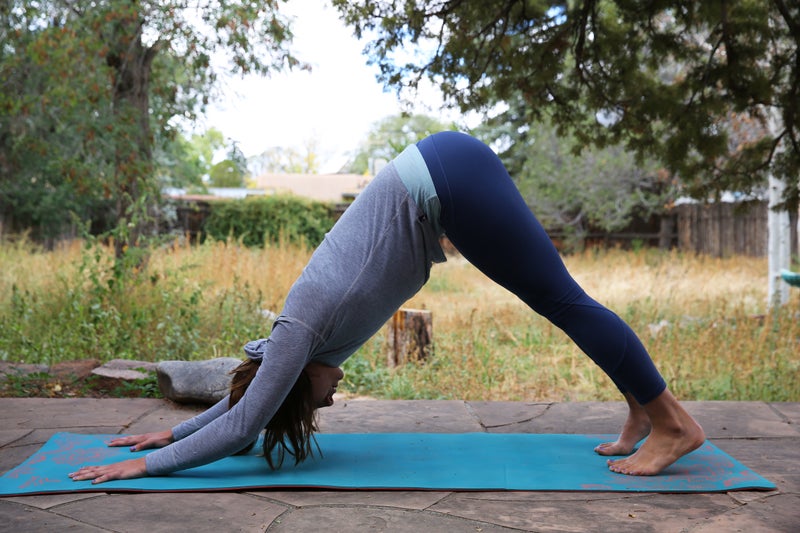
Downward-facing dog is probably the most recognizable yoga pose, and you’ll likely encounter it at least once in every yoga class. This pose gently stretches and strengthens your spine and hamstrings.
To get into downward-facing dog, start in a tabletop position, with your hands and knees on the floor. Your feet should be hip-distance apart. Then lift your knees away from the floor and push your tailbone slowly toward the back of the room where the ceiling meets the wall. Your legs do not need to straighten fully; a microbend in the knees will allow the spine to naturally curve and reduce strain in the lower back. Drop your shoulders away from your ears and actively press your fingertips into the floor.
“Often, I see people with their index fingers pointed inward instead of forward,” says Tina Templeman, a yoga teacher with 14 years of experience. “Make sure to point your index fingers straight forward to create an external rotation of the entire arm. This keeps your shoulders properly aligned.”
2. Chaturanga, or Chaturanga Dandasana
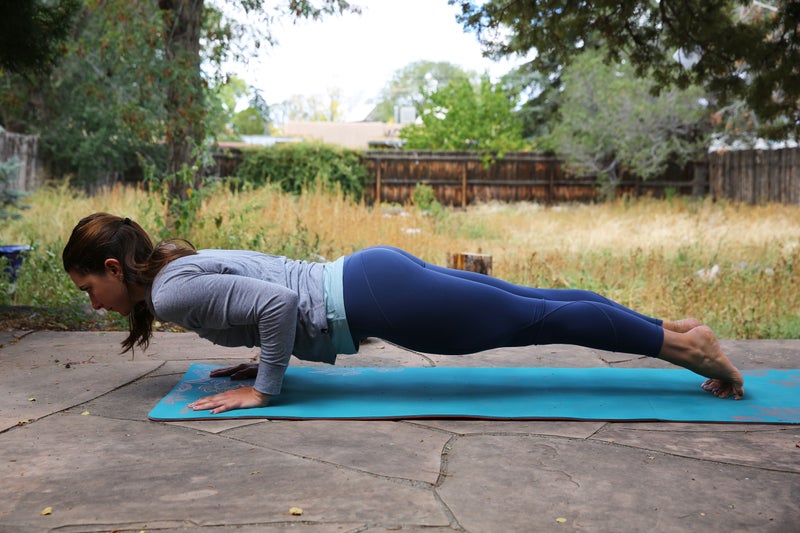
If you’re in a Power Vinyasa class, you’ll likely encounter chaturanga dozens of times in a traditional sun salutation. To begin, go into a plank pose, with your wrists under your shoulders and your toes under your heels. Slowly lower your body toward the floor on an exhale, drawing your elbows into your sides until they reach a 90-degree angle. From here, you can either slowly lower to the floor or go into upward-facing dog. If you find yourself dropping your shoulders, hips, or belly toward the ground in chaturanga, put your knees on the floor.
Chaturanga is a challenging pose that over time can lead to shoulder injuries, so it’s important to approach this pose with focus and caution. Cecily Milne, creator of Toronto-based Yoga Detour, says most yogis should begin learning chaturanga by practicing push-ups on an incline. “Put your hands on a chair and build your strength so you can lower your weight toward the chair and then up again without dumping into your shoulders and rounding [them] forward.”
3. Upward-Facing Dog, or Urdhva Mukha Svanasana
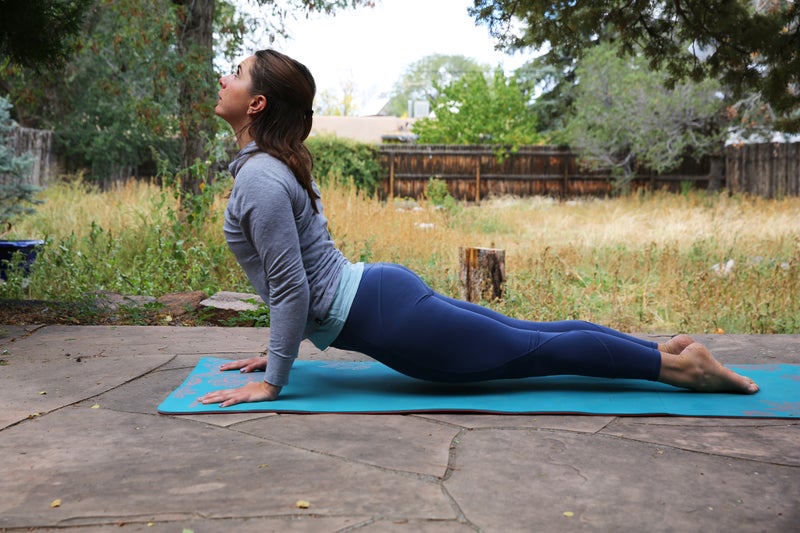
Upward-facing dog typically follows chaturanga during a traditional sun salutation. Start by lying on your stomach. Place your hands alongside your ribs and bend your elbows toward the back of the room. Then lift your head, chest, and neck off the floor, pinching your shoulder blades together. This is low cobra pose; it’s a great choice for people who experience lower-back pain during backbends. If you prefer to continue into upward-facing dog, straighten your arms and press the tops of your toes into the floor to lift your hips, knees, and quads off the ground.
“You want to make sure you’re engaging your hamstrings and glutes in upward-facing dog,” Milne says. “This promotes hip extension. If you let them go, there’ll be more load on your lower back, and it will likely start to hurt over time.”
4. Warrior 1, or Virabhadrasana I
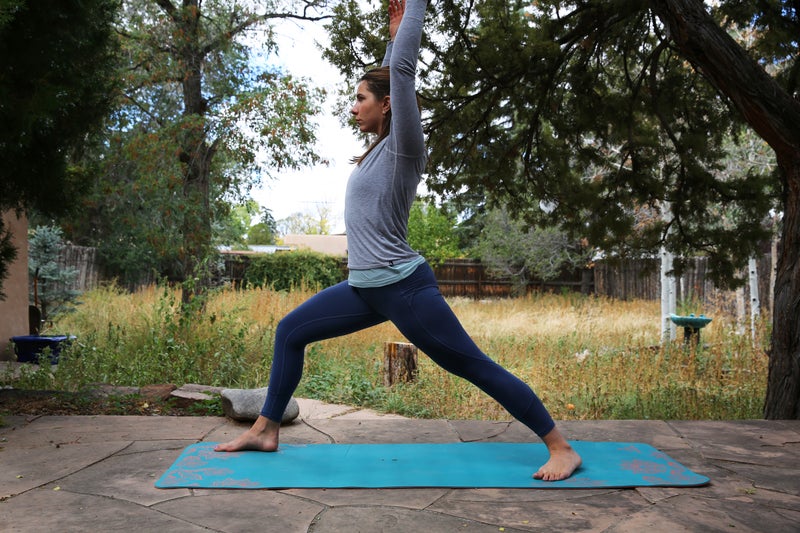
To begin warrior 1, step one foot to the top of the mat, toes facing forward. Step your second foot to the back of the mat, then turn your toes to a 45-degree angle facing the front corner of the mat. Make sure your feet are about hip-width apart on the mat. Bend into your front knee and face your hips and head to the front of the mat.
“Commonly, yogis will relax their front foot and ankle in warrior 1, and then the knee dips inward or outward,” Templeman says. “Instead, try to press your foot into the floor to keep your knee in alignment. Also, think about relaxing your shoulders by spinning your thumbs behind you when your arms are up in the air. This allows your shoulders to rest, so keeping them in the air doesn’t feel like a struggle.”
Try this Yoga Sequence to Build Strength and Stretch Out
5. Warrior 2, or Virabhadrasana II
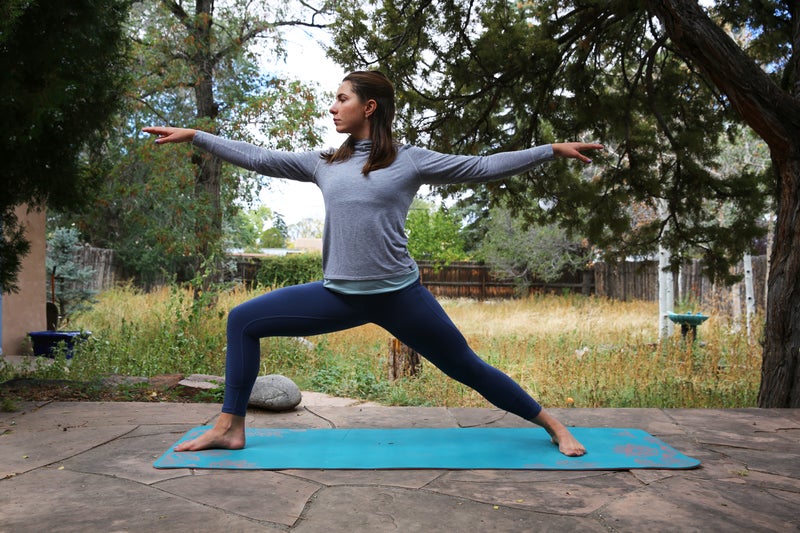
To move into warrior 2, plant one foot at the top of your mat, toes facing the front of the room. Place the other foot at the back of the mat at a 90-degree angle (if that’s possible for your body) or at a 60-degree rotation. Align your front heel with your back heel, if possible. Then bend your front knee and extend your arms out long, palms facing down. Your front knee should be over your front ankle. Press into the ball of your front foot and the outside edge of your back foot. You should feel your inner thighs engage, as well as your front quad muscle. Gaze out over your front middle finger and breathe.
“I also like to remind people to draw their ribs in during warrior 2, because that strengthens your abdominal muscles and your back,” Templeman says.
6. Standing Forward Fold, or Uttanasana

Forward fold stretches the back of your body and strengthens your spine. It also gives you an opportunity to take an extra breath between fast-moving sequences. To move into a forward fold, stand with your feet about hip-width apart, hands at your sides. Then slowly bend forward and bring your hands to the floor, keeping a microbend in your knees. If you’d like, you can grab your elbows and sway side to side to allow your lower back to release. Tuck your chin toward your throat to allow your head to relax.
“I sometimes see people lean back into their heels, but that allows your hamstrings to let go, and you could strain them,” Templeman says. “Instead, you want to put your weight into your toes when you bend forward.”
7. Chair Pose, or Utkatasana
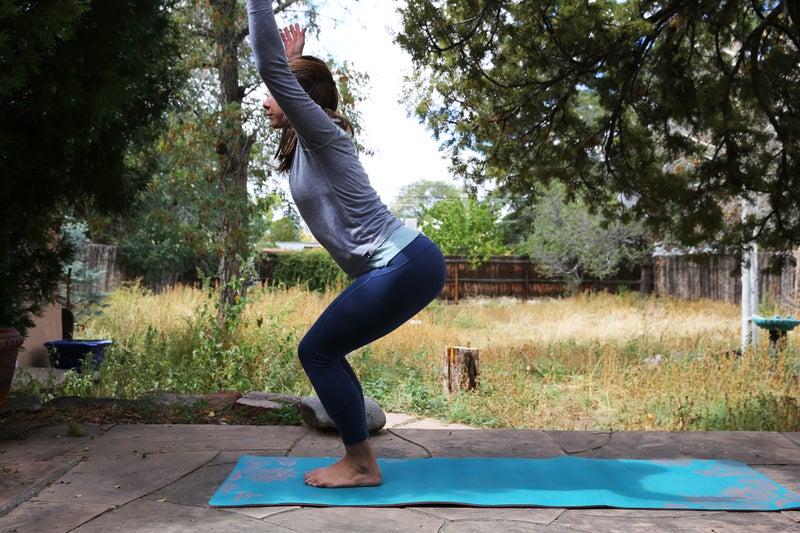
Chair pose offers the opportunity to build leg strength and lengthen your spine. Also known as fierce pose, chair pose is typically offered during traditional sun salutation variations. To go into chair pose, stand with your big toes touching and your heels slightly apart. Then lift your arms above your head, palms facing one another, as you sit your hips toward the back of the room. Imagine that your knees are glued together. Draw your belly button inward to fire up your core. If you’re pregnant or have sensitive knees, you may want to perform this pose with your feet about hip-width apart.
“People get most confused about what to do with their hips in this pose,” Milne says. “But what we really want is length in your spine. So I always say: Reach your arms out of your armpits actively up toward the sky. Keep your heels down and drive your knees forward. Your hips can be wherever they need to be as long as you lengthen the spine.”
8. Sleeping Pigeon Pose, or Eka Pada Rajakapotasana
Reclined or sleeping half pigeon pose is a hip-opening pose typically offered at the end of a vinyasa class or in the middle of a restorative yoga class. To find pigeon pose, first go into downward-facing dog. Lift your right leg up toward the back of the room, then draw your knee toward your nose. Pull your right knee toward your right wrist, then allow the right foot to draw toward the left wrist. If possible, your front shin should be almost parallel with the front of your mat. Untuck your back toes, but keep the front foot flexed to protect your knee. Walk your hands forward as much as is comfortable, perhaps even placing your forehead on the ground.
Most yoga teachers recommend using blocks and other props to make reclined half pigeon more restorative. (Try tucking a block under the right hip and placing another under your chest.) If this pose hurts your knees, ask your teacher to guide you into an alternative option, like figure four pose.
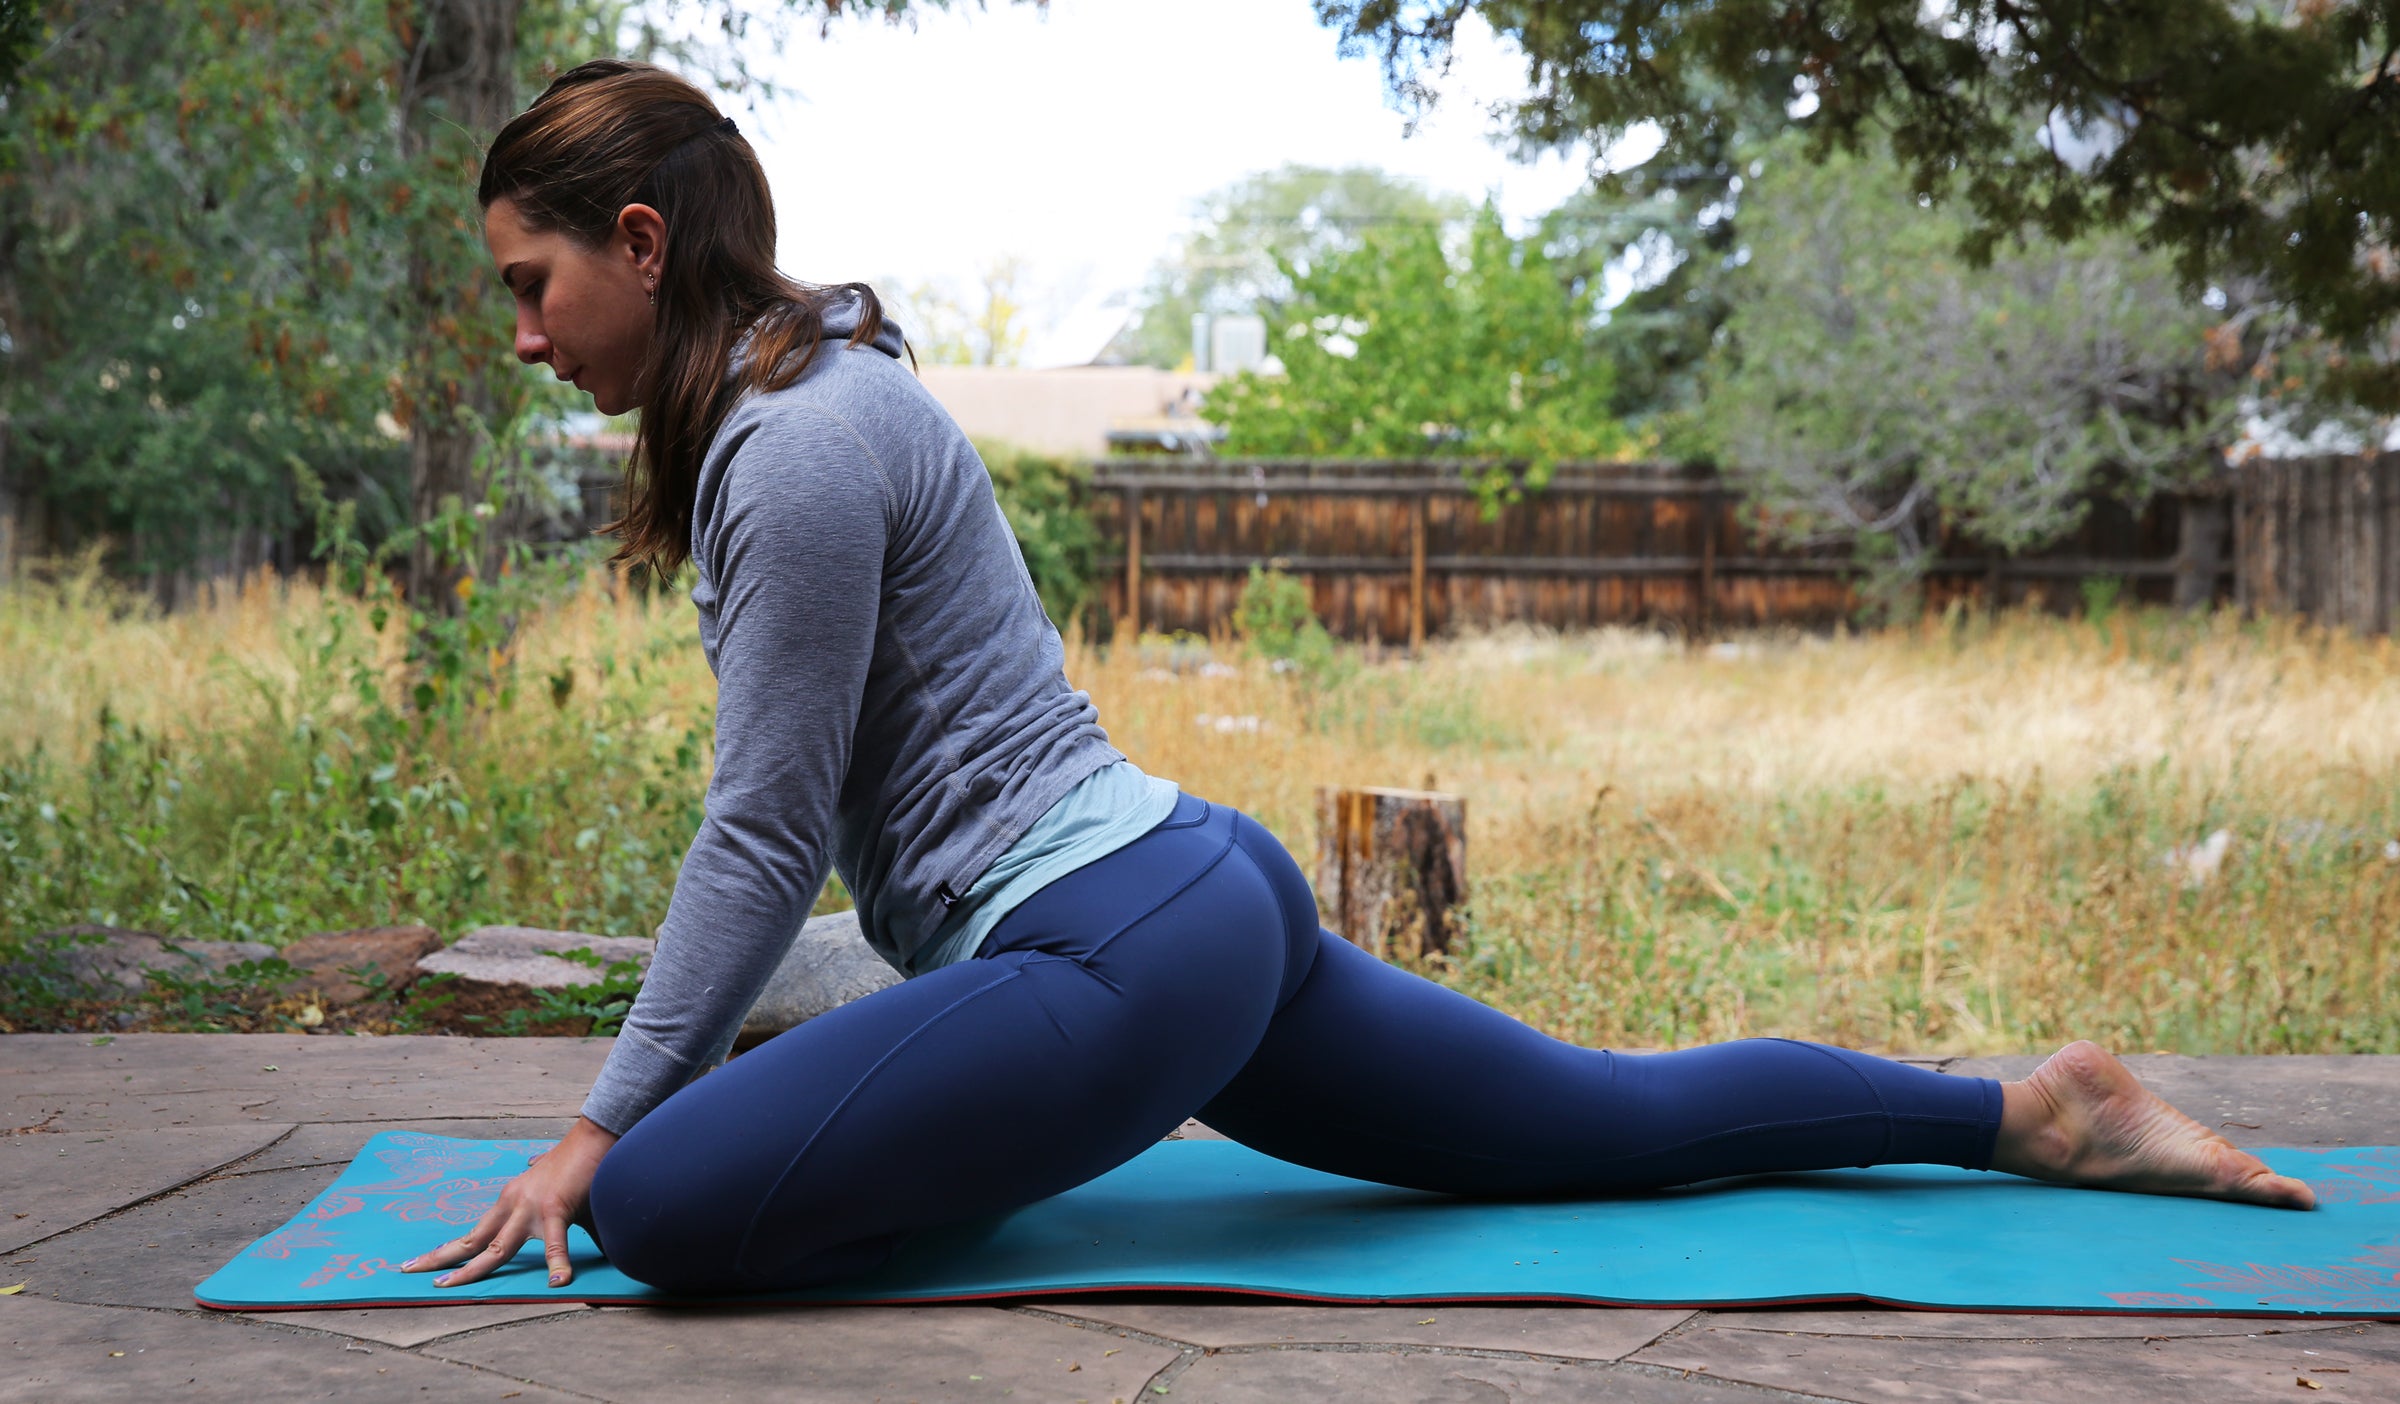
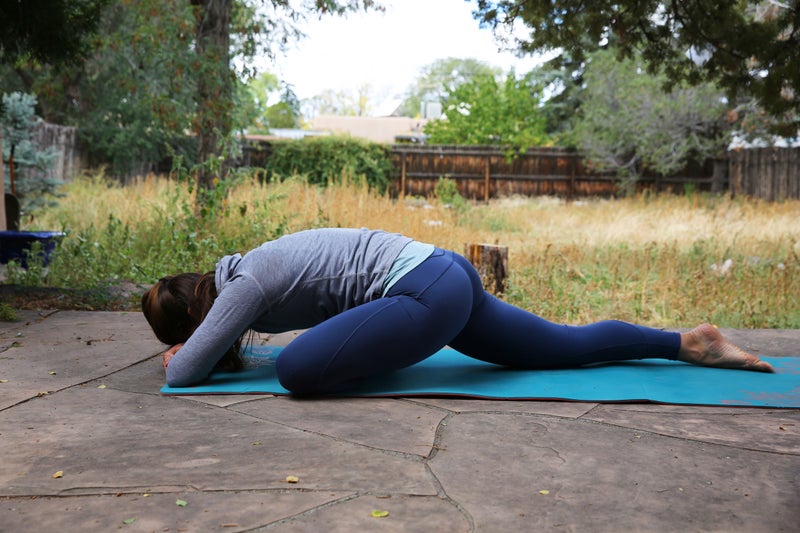
9. Child’s Pose, or Balasana
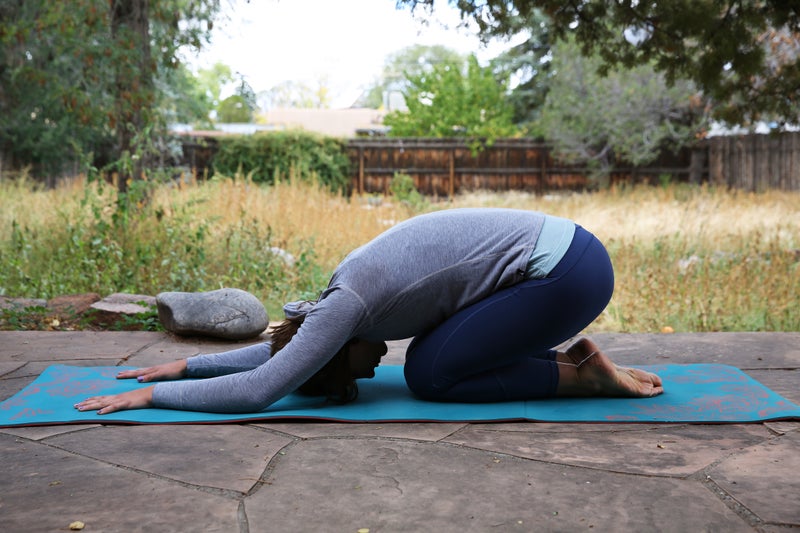
Child’s pose is a resting posture typically offered several times during class between sequences. You can also go into child’s pose as a break if you’re feeling overexerted at any point during a class. To find child’s pose, come to a tabletop position with your knees under your hips and your wrists under your shoulders. Then sit your hips back to your heels, untuck your toes, crawl your hands toward the top of the mat, and rest your forehead on the floor. If you’d like, you can slightly widen your knees to allow your chest to sink to the ground.
“This should be comfortable, but sometimes people’s feet, ankles, and knees hurt,” Milne says. “Especially if you wear hiking boots or run a lot, you might want to take this pose on your back. Actively draw your knees into your chest without using the strength of your arms. Then you don’t have your whole body weight sitting on your knees and feet.”