Microsoft forcing Windows 11 on you? Here's how to stop it, permanently
It's not ok for Windows 11 to install without your permission.

I hopped off for a quick coffee at work the other day, only to discover upon my return a popup that read "Windows 11 is downloading." Now I'd not considered how to block Windows 11 before, but only since I had assumed Microsoft would at least ask me first before installing its most recent OS.
My initial thought was that one of my work mates sneakily clicked OK when it popped up and asked for permission to download. They all denied involvement—my boss, in fact, wishes Microsoft had been brave enough not to release Windows 11 at all, so I doubt it was him.
Anyway, a quick sweep of the web showed a lot of people searching how to stop Windows 11that it's not uncommon for Windows 11 to download and install without permission. A lot of people are getting the same unwanted notification that Windows 11 was installing, which is being called the Windows 11 'push' by sites like Computer World.
I'd been declining the upgrade for months, and I'm pretty sure it had gotten to the point where each time my screen flashed with "We recommend Windows 11 for your device," my only option was to install it now, or remind me later.
I mean, really Microsoft? No means no. Basically I thought it best to share how to stop Windows 11 from installing altogether, so you don't get backed into a corner by Microsoft too. Of course, you could always temporarily prevent Windows 10 updates but the most effective and permanent way is to block updates altogether.
If you've already been forced into the Windows 11 club, but aren't convinced (despite the most recent update having fixed game crash woes) the first step is to Revert.
Revert to Windows 10

Reverting to Windows 10 is simple enough, provided you are still within the grace period that allows you revert to Windows 10 within a specified timeframe of 10 days.
PC Gamer Newsletter
Sign up to get the best content of the week, and great gaming deals, as picked by the editors.
Just navigate to the Start menu, then go into Settings > Windows Update > Advanced options > Recovery, and select Previous version of Windows.
Make sure to note down the exact version of Windows 10 you're on, we'll need that later—it'll be in the format of 21H1, or similar, depending on which version you're reverting to.
Using Regedit
If you're using Windows 10 Pro, Enterprise, or Education edition, you can use the Local Group Policy Editor. Home edition users will need to jump into the Registry Editor instead, as there's no access to the former on Home.
First mash Windows+R, then paste regedit in the Open box, and run it.
If a User Account Control prompt pops up, hit Yes.
In the Registry Editor, navigate here: Computer\HKEY_LOCAL_MACHINE\SOFTWARE\Policies\Microsoft\Windows\WindowsUpdate
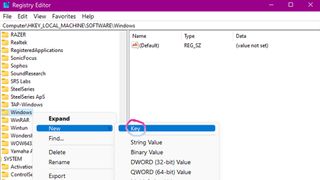
If the WindowsUpdate directory isn't there just right click the Windows directory, choose New, then Key, paste WindowsUpdate in there and press Enter.

The next step involves locating the TargetReleaseVersion file in the right pane and double clicking it.
If it doesn't exist yet, right click the blank space and select New, then DWORD (32-bit) Value, and paste TargetReleaseVersion in there. Then hit Enter and now double click it.
In the Value data box that appears, enter 1, and hit OK.
If there's a TargetReleaseVersionInfo entry there already, double click it.
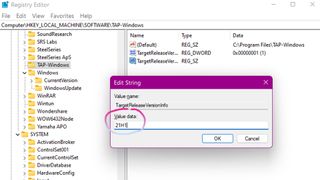
If not, right click the blank space again and select New, then String Value, and paste TargetReleaseVersionInfo before hitting Enter. Now you can double click that.
When you get into the Edit String prompt, under Value data simply paste the version of Windows you're looking to stick with, and hit OK.

Now, simply restart and that should keep Windows 11 from installing altogether.
Remember though, you'll need to update manually if you see a version of Windows 10 that catches your eye. To do so, simply go through the process again and change the version where you entered it last.
Using the Local Group Policy Editor

If you don't have Local Group Policy Editor, but would like to install it, you can enable it by following the steps here.
First press Windows+R on your keyboard, then paste gpedit.msc into the box and run.
Simply use the side panel to navigate to Local Computer Policy > Computer Configuration > Administrative Templates > Windows Components > Windows Update > Windows Update for Business.
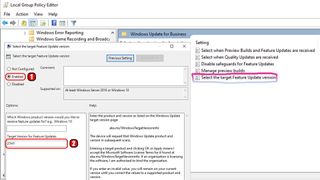
Then double click Select the Target Feature Update version and Enable it in the top left check boxes.
Below that, in the Target Version for Feature Updates box, paste the version you want to stick with. Apply it, and click OK.
That's it. Now just restart and revel in the fact that Microsoft has nothing on you.

Screw sports, Katie would rather watch Intel, AMD and Nvidia go at it. Having been obsessed with computers and graphics for three long decades, she took Game Art and Design up to Masters level at uni, and has been demystifying tech and science—rather sarcastically—for three years since. She can be found admiring AI advancements, scrambling for scintillating Raspberry Pi projects, preaching cybersecurity awareness, sighing over semiconductors, and gawping at the latest GPU upgrades. She's been heading the PCG Steam Deck content hike, while waiting patiently for her chance to upload her consciousness into the cloud.
Most Popular

